Passing Data Between Pages in an Ionic Application
In the previous posts, we have seen how to setup a basic navigation between multiple Ionic app Pages. This post concerns what if you want to send some data from the previous page to the next page in the stack? For the Ionic provides NavParams class to transfer data from one page to another.
Generate the application
🔗In this demo application we will first setup a home page with a text box to enter data that will be transfered to the next page. First, let’s generate a new Ionic application:
$ ionic start -a 'Passing Data between Pages' -iapp.passdata.pages ionic-pass-data-pages blank
Create a new about page:
$ ionic g page about
And lastly, to complete our setup, we must add about page in the app module:
1import { BrowserModule } from '@angular/platform-browser';2import { ErrorHandler, NgModule } from '@angular/core';3import { IonicApp, IonicErrorHandler, IonicModule } from 'ionic-angular';4import { SplashScreen } from '@ionic-native/splash-screen';5import { StatusBar } from '@ionic-native/status-bar';67import { MyApp } from './app.component';8import { HomePage } from '../pages/home/home';9import { AboutPage } from '../pages/about/about';1011@NgModule({12 declarations: [MyApp, HomePage, AboutPage],13 imports: [BrowserModule, IonicModule.forRoot(MyApp)],14 bootstrap: [IonicApp],15 entryComponents: [MyApp, HomePage, AboutPage],16 providers: [17 StatusBar,18 SplashScreen,19 { provide: ErrorHandler, useClass: IonicErrorHandler }20 ]21})22export class AppModule {}
Add Input Text in Home Page
🔗Then we will update home.html:
1<ion-header>2 <ion-navbar>3 <ion-title> Passing Data in Pages </ion-title>4 </ion-navbar>5</ion-header>67<ion-content padding>8 <ion-list>9 <ion-item>10 <ion-label>Enter</ion-label>11 <ion-input placeholder="Your fav color..." #color></ion-input>12 </ion-item>13 </ion-list>14 <button15 ion-button16 color="secondary"17 (click)="goTo(color.18 value)"19 >20 About Page21 </button>22</ion-content>
#color is a local variable whose value we will be referencing to pass on to the next page in our navigation stack. We will now update our home.ts with business logic behind the only click event in our template:
1import { Component } from '@angular/core';2import { NavController } from 'ionic-angular';3import { AboutPage } from './../about/about';45@Component({6 selector: 'page-home',7 templateUrl: 'home.html'8})9export class HomePage {10 constructor(public navCtrl: NavController) {}1112 goTo(color) {13 color = color || 'No Color Entered';1415 this.navCtrl.push(AboutPage, {16 data: color17 });18 }19}
Note the second argument in this.navCtrl.push() which is being used to pass the data.
About Page
🔗To Pass data from Home page to About page we will need to import NavParams class. Since, I am using Ionic CLI to generate pages, class NavParams will already be imported in the about page.
1import { Component } from '@angular/core';2import { IonicPage, NavController, NavParams } from 'ionic-angular';34@IonicPage()5@Component({6 selector: 'page-about',7 templateUrl: 'about.html'8})9export class AboutPage {10 color: string;1112 constructor(public navCtrl: NavController, public navParams: NavParams) {13 this.color = navParams.get('data');14 }1516 ionViewDidLoad() {17 console.log('ionViewDidLoad AboutPage');18 }19}
Display Fetched Data
🔗To catch the data from the previous page in the navigation stack, we are using get() method of NavParams class. We fetch data inside the constructor function of AboutPage class.
Finally, to display data on about page:
1<ion-header>2 <ion-navbar>3 <ion-title>About</ion-title>4 </ion-navbar>5</ion-header>67<ion-content padding>8 <label>Color Entered: {{color}}</label>9</ion-content>
Summary
🔗Here are some screenshots:
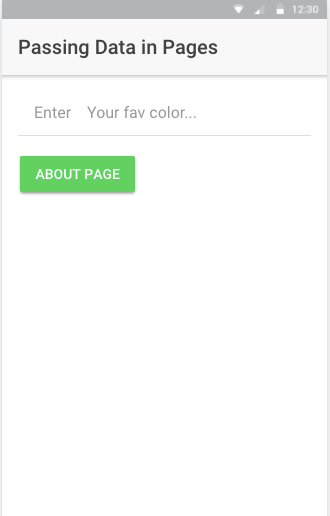
Home Page:

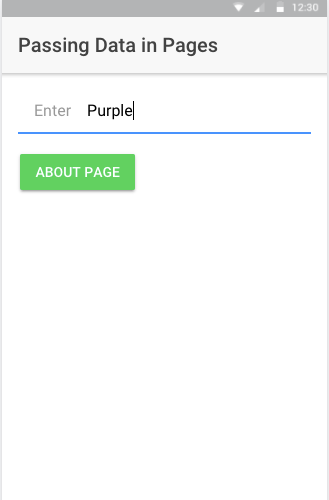
User Input being entered:

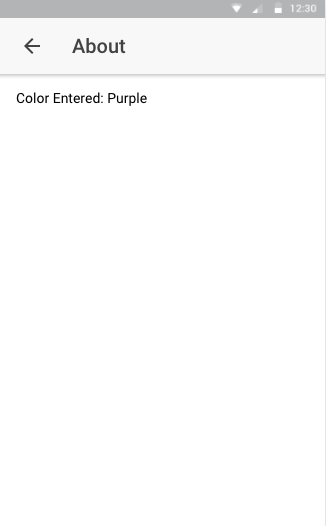
Data passed form Home Page displayed on About Page:

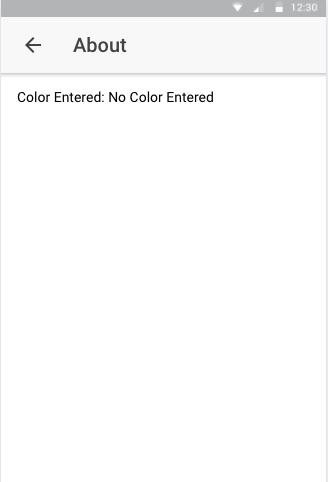
When nothing entered in the input field, a default text passed and displayed:

To get the full code of this demo app, you can visit this Github Repository.
More Posts
Browse all posts